Showing posts with label bedroom. Show all posts

Wednesday, January 16, 2013

2013: Upstairs Closets

Last year, we made (and I never blogged about) a cloffice (closet office). It's one of my favorite things in our house. One day I will explain the creation/inspiration for said cloffice, but today...I am writing about closets, in general. Toni, from A Bowl Full of Lemons set an organization challenge this week of closets, so I'm here blogging about our three very different closets: our cloffice, our master closet, and our linen closet. Would I say that any of these three are *completely* finished? No. Are they all FAR more functional and actually pretty enjoyable? Yes. 

#1- The Cloffice


It's pretty simple in that...I love it. There are a few wire shelves to the left (that came with the closet) as this room is relatively small. This is also a terribly bright picture, but the wall is super navy and I super love it. I super hate the chair. We're saving up for a nicer one...maybe acrylic? I want it to stop stealing the show from my navy wall. This stores all of my gift wrap, old magazines, tissue paper, random small crafty things, and, obviously, our files. I also copied Toni's original filing system[I couldn't find the link but it's all over pinterest] and it made my heart so happy over spring break (last year) that I probably could've cried. That's serious. 

I should write more on how amazing this is, but for now, the pictures are on my hard drive and it's not hooked up...so I'm moving on to...

#2- The Master Closet

Truthfully, our "master" isn't billed as the master. The boxier room downstairs has an attached bath. It also has a smaller closet...with the water heater in it. This one has a double closet and it has been my room since my mom purchased our house when I was a sophomore in college. It has been different colors (on its way to a new one) and had many different sets of furniture and arrangements, but I love this room best. We redid our closet system in April 2011...after my husband's side fell. down. It has worked pretty well. It's still not huge, but that's the nature of the beast. Our upstairs bedroom closets like this one and the cloffice have slanted ceilings because they begin the transition under the eaves of our house. It's kinda weird to explain...maybe one day it will make sense and I'll have a picture of our oddly-shaped home. :)

Basically, this closet kinda stopped functioning so our room looked INSANE. Seriously.
Exhibit A:


 This was the point where I took everything on the floor (ie: should go in the closet) and threw it all on the bed. That has ALWAYS been how I clean my room. I make it so that the room "looks" clean-ish and then I go through the stuff on the bed. Typically, it works (as I'd like to get in bed at night). However, in college I slept on a pile of laundry for a few days because I just didn't. feel. like. folding. 


This is what the bed looked like from the other side. WHY DO I HAVE SO MUCH CRAP?!?!?!?!?! Seriously, almost none of this is my husband's. In fact, none of it is his. 


 This beautiful clear space on my side of the bed was my motivation. It still looks this way days later, thankyouverymuch.


 True confession? This part still looks slightly similar. The stuff closest to me & the camera needs to be donated/consigned and I just haven't been home during daylight hours to go through it the rest of the way. #comeonsnowdays2013!


See? I told ya we'd sleep here that night. How we sleep without moving the frames/canvas to adjust to center (to align with our mirror), I will never know.


This is the bag of donations. You'll notice they're mostly my husband's. Someone keeps losing weight. The only weight I'm losing is the half-ounce of nail polish that has clearly disappeared from my toes.


Then, I look into this beautiful closet and I don't care that my toes are chipped or that I won't be able to work out until April (#lifeofanOdysseyoftheMindcoach) because my closet is SO PRETTY. Things are organized my sleeve-length, and then rainbow order. I do keep all jackets to the right and dresses to the left. Also, in the right side there are probably...7-10" of space. I hung some 3M hooks with my 4 big purses, which house all of the little ones. It's splendid.


 Please don't judge the crazy curtain situation. I hung one of two panels on his side of the closet to see if I liked the no-door, curtained look. I do. I just haven't gotten around to hemming all 4 or hanging the other 3 panels. Soon. And very soon (that's an inside joke for you, Mom...and anyone else super familiar with the Baptist hymnal).


This is my husband's side. See all of those empty hangers? They were full FIVE MONTHS AGO. I tell ya, Insanity works. My man is looking mighty fine and diminishing by the day. He's so healthy I can't stand it. If he has to give away any more shirts he's going to be so naked nobody else can stand it.

........................................................................................................................

And on to my newest addition to the 2013 Cleaner Closet Campaign, the Linen Closet! Hooray!

So, I went to Target at 10:20 p.m. on a Monday. I just...I had to have some baskets. I got the lovely y-weave and (apparently) I got the fall/winter ones that they are phasing out because 5 of them were on clearance- SCORE! I bought 5 of their large size and 2 of their mediums in white. Sidenote: The spring ones are also teal, but they were slightly lighter by comparison in person. Also, we used red ones for our laundry room and the ones now are a tad more...fluorescent? It's hard to describe, but noticeable since I already owned some. 

I also bought one of the little tiny Sterilite drawer sets for things I wanted to corral. I hit up the dollar bins because WHY NOT and found one other little box I didn't even know I'd use. 

This closet performs many duties: sheets, towels, medicine cabinet, paint supplies, extra throw pillows, beach bag [not pictured=not organized- sorry, beach bag]. I just needed to corral items in a way that would make sense. Here's where we started:


There are few more bed pillows that get stacked on top, but they were used this past weekend by some guests, so I haven't gotten them put away yet. Otherwise, this is pretty much what it looked like. OH, it did have a basket with ALL of the "medicine cabinet" related items. They were all thrown in with extra soaps, travel stuff, random lotions (kids give the best and worst teacher gifts), aloe-type stuff, back scratchers, etc. That was in my living room floor but came from the shelf that has the...smoke detector on it. You'll see the basket filled with trash later.


Yes, the lighting is terrible. No, it really is that ugly. Brassy knob. Builder white? beige? paint. I have not painted, but now that it's organized, it will be much easier to get everything out of here and paint it up one weekend. 

 You can see that I tried REALLY hard to utilize baskets, but I had random ones and some didn't really fit or you had to pull them both out to get to one...
now I have THIS:


Top Shelf: 
-still pillows (and the zip-up picnic blanket/pillow thingy)
Second Shelf: 
-basket on left: hand towels/wash cloths
-drawers: medical tape, ointments/creams, floss/oral ointments, bandaids, Breathe Right strips, sinus/allergy meds, thermometer
-divided organizer on top of drawers: small hair rubberbands (the plastic-y ones I use for special teacher-spirited hairdos), extra contact cases
-basket on right: "medicine cabinet", travel-sized stuff, extra glasses/cases, a few bars of soap & body butter, a box of unopened Prilosec, gauze/Ace bandages, handheld back massager, and that little thing from Avon that gets the pills off sweaters- what's that called? Sweater shaver?


You can probably guess that the third shelf is towels. We have 2 that go on the left (in the wash) and guest towels are in that basket in the middle.
Below that, the left basket is extra sheets. When we travel and bring sheets we have a set for a double bed and a set for a king. We use them more than I would've anticipated. The set in the middle has never been opened, but one of our current sets is wearing thin. The basket on the right has our current sheets that are in rotation.
Bottom shelf left basket has cleaning supplies for the upstairs, a make-up bag I can use for bottles & things during travel, and the right basket is where we keep random electrical things (extra smoke detector, pop-up lights & bulbs, my husband's knee brace, heating pads).

One last look! Top!


 ...and bottom!


 The beach bag will fit perfectly in the middle of the floor between those paint cans! Booyah!

The basket below WAS my "medicine cabinet" basket. That is now trash/recycling, minus the peroxide which is going downstairs to make laundry (armpit) pre-treater.


This make-up bag is a little less effective for me, but I'm going to see if I can't change my travel habits with packing that kind of stuff and keep it in my closet with the matching garment bag. I hate splitting up a set but I do know some really good consignment places.


And this will ALLLL be going to Freecycle. Freecyclers love beauty products because they're often expensive. If someone has extras of something you use, might as well get it for free!


I'm feeling MUCH better about my life in our closets. It took less than a day to construct our cloffice and less than 2 hours to organize the other two. Definitely a do-able night or weekend thing! I think our life will run MUCH more smoothly with our closet stuff organized...and I can't wait to get some bookplates/labels for those linen closet baskets! 

Our space-filling project for under our shelves is coming later this week! :)
A Bowl Full of Lemons

Monday, January 7, 2013

Who's the fairest?

Yup, you guessed it. This is a mirror post. Basically, this post will highlight the #1 clutter reducing, good stuff-scoring thing ever: freecycle.

Freecycle has literally taken SO many things we didn't want out of our house. I know you're thinking, "Why don't you just donate everything?" Here's the thing, you can freecycle things you canNOT donate. You can freecycle used candles (people melt them down to make new ones or use in warmers). You can freecycle soaps/bodywashes (ie: things not eligible for individual resale)...perhaps even the soaps and bodywashes left behind by past roommates, in case you happen to have had 9 people live with you in the same house in 8 years. Yes, my house has some semblance of a rotating-roommate syndrome.

In this case, however, freecycle HOOKED me up. You see, I got an email saying that someone was offering a ginormous mirror, something like 2+ feet by 3+ feet. CRAZY. And the best part? Obviously- F.R.E.E. My husband went and picked it up and it was...dusty. So, I cleaned it off with some GreenWorks all-purpose spray cleaner and some paper towels Then, I filled the nail holes (previous owners had just nailed it into the wall and we wanted to go the picture-hanger route) with wood putty, sanded, and taped it off to paint! Sidenote: Super stupid to paint with a new rug...but it was FREEZING so i covered it with newspaper, sheets, and then moved the can away to hammer it closed. I painted this with Valspar Interior/Exterior Gloss. We got it to do the floating shelves I still haven't blogged about we hung in the living room. Supplies: painter's tape, small roller, angled brush, sand paper (for prior sanding)


Yup. This happened.


 This took a BAJILLION coats. It took me 4 or 5 actually. I went ahead and pulled the tape off after 3-4 coats and then went ahead and touched up with the brush. If paint got on the mirror, I used ye ol' razor blade to scrape it off of the glass.

 I like to make the same mistakes twice...and in close-up...and after putting on my paintin' shirt.
 And now, the march upstairs to the bedroom! My husband was still super dressy. I liked it. Please don't mind the hot mess that is a) my dresser top, b) paint swatches stuck on our wall with electrical tape, c) my bed. We centered the mirror over the two Malm dressers that we have in our bedroom (yes, this led to re-centering out entire bedroom...maybe you'll hear about that by next month?)


 My husband changed into more comfortable clothes, put the "hanging kit" on the mirror. We bought one at Lowe's for like, $7? We wanted to make sure it would hold it because this mirror is SOLID. It probably weighs 15-20 lbs. He got a little help from Duchess. #kittyphotobomb
 This is the hanger. Self-explanatory. I still give a caption. I can't help myself.
We hung it and I just, I didn't feel good. I could see some of the hanger, but I LOVE the wire hanging kits because you just have to adjust the wire (as seen on the left side of the mirror). He adjusted it, moved out of the way of the photo (haha), and displayed how terribly off-center my bedroom is, as evidenced by the canvas hung on the opposite wall. Ugh.

 Adjusted, wire clipped and hidden, mirror leveled (the tiny red thing to the right of my husband's head).
 AAAAAAAND...gratuitous smiley self-portrait in the new mirror. Chris likes this because it looks like I'm just doing "victory hands" instead of actually holding the camera. I like that I don't look as tired-drunk as I actually was. I think we hung this at midnight or, as my husband likes to call it, "the project hour".


Budget:
Mirror-free!
wood putty- already owned
sand paper- already owned
angled brush- already owned
roller & cover- already owned
painter's tape- already owned
paint- already owned
hanging kit- $7.69ish? I say "ish" because I'm not sure, not because I'm saying "approximately [this] exact amount"...that annoys me.
Total: LESS THAN 8 BUCKS!!!!! Woohoo! A mirror this size would cost me mucho dollars if I had bought it new, or even from many antique/second-hand stores! Hooray! 

Truthfully, I was so excited this happened because I just needed to stop "collecting" this stuff and actually DO something with it. This year's to-dos are often going to be inspired by John & Sherry's "Dude, Get On That Already" series.

So, my list of "to-dos" now looks like this:

-finish painting frame and hang (FREE!) mirror...and blog about it
-finish bottom floating shelf with wine glass holders...and blog about it (later this week?)
-finish floor transitions (install upstairs & return crappy downstairs ones and buy the correct ones)...and blog about it (this may take awhile, it's becoming a headache)
-vacuum the rug (before I blog about anything in the living room with pictures)
-put away all of the Christmas gifts and clean up!
-blog about the "new" living room (I think we've finally settled on an arrangement-this could be coming soon!)

I'm already making new goals for when these are accomplished. Thanks for those of you still checking in! What are some house projects you're getting accomplished? Anyone thrilled that a quick project was actually...quick? Taking on bigger projects? Leave a comment and tell me all about it! :)

Want more fun (and often, cheap) projects? I linked up today at:

Wednesday, August 17, 2011

long time, no see.

Most of you are thinking one of two things: 1- she does exist or, 2- crap, I got alerted to read her crap again.


I'm ok with either of these as long as you're here.


I do apologize because I hate looking at my google reader and realizing there are a million blogs I subscribed to or bookmarked that never write. By the same token, I'm pledging to do better. Also, I originally typed "by the same toke" and laughed because I never make marijuana jokes.


See? Those of you originally thinking "She does exist" are now frustrated that you were alerted to read my crap. :) So, I decided today to start small with the blogging. We have actually done a ton of things around the house since the last time I blogged. I do hope to start talking about all of those things soon, but some of them will be more in-depth, so today I'm starting with the smallest/most recent things we've done.


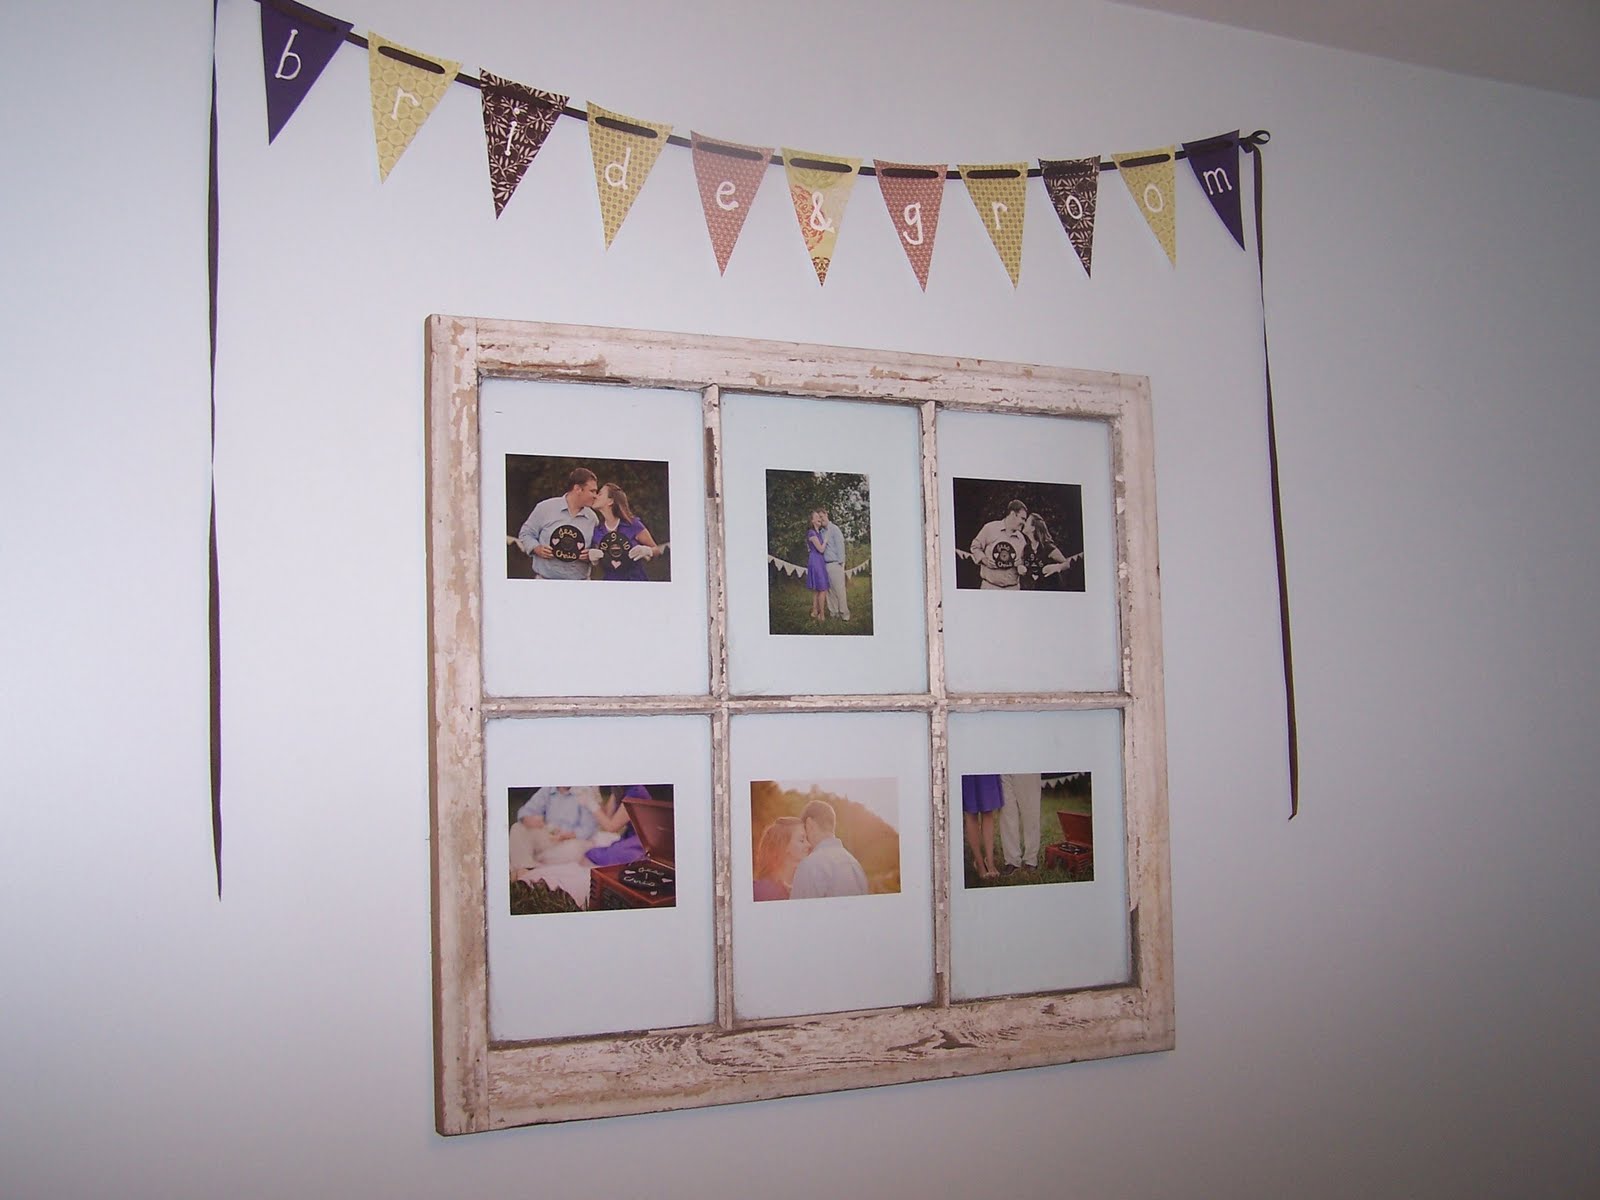
Abou a year ago (weird), we did some engagement photos with Rachel Clarke who, sadly, is no longer doing photography, but has decided to bravely follow a new plan for her life. So, we wish her the best and hope that she finds all of the things God has planned for her and is able to see them to fruition. So, Rachel had done a photography contest with a themed engagement shoot. We had planned to do a vintage Fredericksburg/river/picnic shoot, but plans ended up changing and we did the shoot at the house of my good friend Nathan's parents. His wife, Andie, also styled the shoot for her business, before realizing God's plan is to currently continue being a stay-at-home for her darling daughter, Cadence. Thankfully, these ladies used their talents to help us. We used my vintage handkerchiefs for a backdrop and staged a little picnic/sherbert/music playing session with a record player & Chris' guitar. We had ordered our photos before we ever got married, but didn't have a way to hang them. Luckily, Chris also headed up his church's yard sale last year and he got this sweet busted up window. I had a plan! I had seen a few window/picture frames around the internet and really got interested once I got on Pinterest. Holy crap. I love Pinterest.


We decided to start this project Sunday evening. It took 2 hrs. Yes. I am ridiculous. At first I thought we'd stick the photos to the window, but then I realized I didn't want to put anything adhesive on the actual photos, so I was hoping we could figure something out with double-sided tape on the wall. We were awful about taking photos. I apologize in advance. We bought some keyhole fasteners to screw onto the back of the window. Chris got those into the frame (careful to stay away from the glass so the screw wouldn't crack it) and then we put anchors in the wall. That part was easy-peasy. I took the window back off of the wall and laid the photos where I wanted them. Also, easy peasy. So, my genius thought was to mark a dot on the window glass with a dry erase marker and then measure where they fell in the frame. Then I hung the window on the wall and marked a small line where the end of the frame would hang. Perfect, right? Yes...except not. So then I measured from that line to the measurements for each dot and hung the photos with double-sided tape on the wall. Sweet. I hung up the window aaaaaaand... nope. They were all off-center by about an inch. Why? I'm not really sure. We tried re-doing the same thing and it still worked, in theory, but looked wrong. We ended up taking the window down at least 6 million times. It really felt that way. We would hang it, eyeball where the photo should move, take it down, move one photo, hang it up, make sure that was right (it usually wasn't the first time), take it down and adjust a bit more, re-hang it, figure out the next photo, etc. Funny thing, I was wearing my husband's sock on my hand so that I could smooth out the tape/corners without fingerprints on the photos. I'm a fingerprint nazi. After another hour or so of all of this business, tada! It was hung. (that's what she said).


We realized that with the handkerchief pennant banner in the background, it looked really cool to hang our little flag banner from our wedding reception over the window to further frame it out. So, here's the final. Forgive the awkward reflection from the paper lantern (I don't like) in the window. We can't figure out what to do with a ceiling light in our room. We don't always agree on what it should look like, so we're stuck with the paper lantern for now.  Also, we don't have fancy (or boring) photo editing software, so they might kinda look like crap, but you get the jist.


Trying not to get any reflection...
 Full frontal...

Here's a close-up of the pictures. My next goal is to have the records (that we're holding) framed and to take the 8x10 that is similar to the two in the top corners so that it can go somewhere else in between the two record frames. Soon...


Aaaand a close-up of the banner that I made out of scrapbook paper and ribbon for our wedding. I actually hung it on this wall previously, took it down to make room for a piece of furniture, rearranged furniture, and finally got it hung again.


This is just a ring shot. I really loved it because she incorporated my vintage hankie box that my grandmother gave me. I think my ring looks awesome, even in a $5 Ikea frame.


     We took a few days and went to the beach to visit my Sissy and her husband's family who are up (and down) from GA (and NY). It was sweet. Amazing weather. However, we finished the window project Sunday night before we left and that made me motivated to do something else tonight when we got home. My grandparents are big antique collectors and always have old tools and things that I like to collect/use. I feel like having their things and hearing stories that are associated with them will help me have heirlooms in the future for my children who might not get the amazing gift of knowing my grandparents. Seriously, they're amazing. Probably the most amazing people I'll ever know. Thanks, Jesus, for giving me these amazing people.
     OK, back on track. I had been on Pinterest (seriously. obsessed.) a few months ago and had seen a photo of an old rake head used as a necklace rack. I thought, "Man, Pa must have one of those laying around." I looked for some at an antiques festival in April and couldn't find one. I mentioned it casually and my grandfather said, "Sure, I have a pile of scrap iron." What?! Amazing. Last weekend, I found it laying near his garage and Memaw said they had set it aside just for me. I'm so lucky. :) So, before bed tonight, I decided to find a nail and hang it up! We eventually want to make our closet wall into a wall of fabric, a la Katie Bower, but, for now, we have doors. I wanted to hang it so it hides behind my door (without scraping the door) but also doesn't look too crazy with the big window. When I held it close to the window, it started to look super off balance because there isn't anything on the other side (yet), but I also didn't want it to be a part of the overall scene in case I wanted to add other photos/frames down the road. We may have to move it out a bit since I think the fabric wall will take up some space, but for now, it looks awesome. All it took was a little scrub (to keep rust off the wall) and a single nail and...tada!


And a whole wall shot...again, pardon the stupid cord and paper lantern. It's not too bad, but it does make me REALLY want to hang some more frames/photos soon!


I really love it. Really. Really. Love. It. That's a lot. Also, thanks to my husband for not thinking I'm crazy when I start these projects at 11 p.m., ask my long-distance best friend to call me at 12:30, or stay up writing blog posts until 3. I'll try to be less insane once the school year starts, but I can make no promises.

This is the first of many projects that I'll be posting soon (hopefully) and I already feel more motivated to finish some of the ones I've started so I can share with the few, the proud, the readers of my blog. Happy end of summer!


I meant to post my inspiration photo from Pinterest, so here it is! I didn't actually use a specific inspiration to hang the window, more for reference about how people chose to hang the somewhat-heavy windows, so I don't have a specific photo for inspiration. I typed "window picture frame" into the search bar and came up with tons of results.