
Anyway, one Thursday night this spring, I decided to get active about a bunch of stuff that was laying in a pile in my floor. I am a coach for Odyssey of the Mind at my school and I had collected a pile of scrap wood for my Odyssey team. Well, it ended up being really nice quality wood, way better than I wanted to give to 7 3rd-5th graders to practice using. In this giant pile there was a cute little ladder, like the kind for a kid's bunkbed, but definitely homemade. I had plans for this ladder.
 |
| From here. |
I kinda tried to google how to do this, but then I just studied the picture really carefully. I'm all about buying stuff on etsy, but I already had everything I needed, I was pretty sure. We went out to Ace Hardware and bought 4 small L-brackets (2 top and 2 bottom) and some teeny tiny screws to screw the brackets into the ladder. I knew we had a-plenty of anchors/screws for the walls. So... about $6 later, we were all set!
So, like I said, this was all laying in the floor for days until this magical Thursday evening inspiration! We recently rearranged our living room (I'm sure one day I'll write a Living Room Metamorphosis post) and I had the perfect spot over our leather armchairs to hang this big ol' focal ladder.
 |
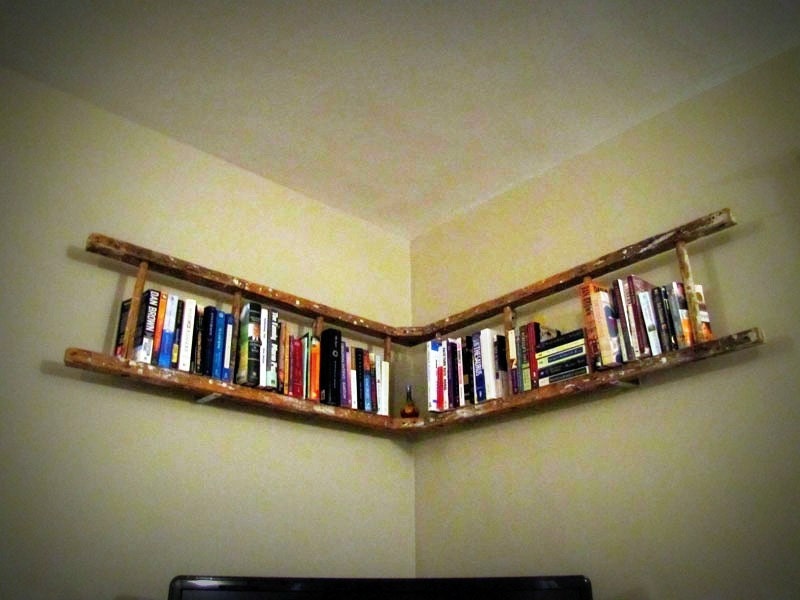
| Here she is in all of her glory. Our living room doesn't even look that awful in the background. Yes, the carpet really is that dirty. Yes, we are getting laminate floors next month. |
 |
| This was pretty straightforward...getting the wall ready for the anchors. Also,our trip and ceiling are the same color of white, but our camera stinks. So, yeah. |
Step 1: Find the studs. One is in the picture above, HAHA, but seriously. Studfinder is my hero.
Step 2: Hold up the ladder to see if it works where the studs are located.
Step 3: Mark the bracket holes on the wall to align with studs. Mark holes on the top and bottom of ladder for the baby screws to hold the brackets to the ladder.
Step 4: Use anchors where the holes are for the other part of the wall (I don't think we ended up doing this. I think we used our screws all directly in the stud. That made me feel better.)
Step 5: Screw the bottom brackets into the ladder. Then, have someone hold up the ladder to match the holes on the wall and have the other person screw the brackets to the wall.
Step 6: Line up the top brackets, screw into ladder, screw into wall.
Step 7: Deck it out with stuff.
VOILA!!!!!!!!!!!!!!!!
 |
| This is nighttime. |
 |
| This is daytime. Yes, our house is that dim. Yes, that's my green sleeve because I had to sit the camera on the mantel and use a mirror to see if it was taking a picture of the right thing. One day, I'll get a nicer camera. Until then, suffer through it with me. :) |
I love it! And, I love that I can switch it up for holidays or any other time when I get bored. Thanks, freecycle for your nice supply of extra lumber! :)
Any fun wall art in YOUR home?! Thanks for stopping by our hole in the web!
No comments:
Post a Comment